The journey to a stronger, healthier you often begins with a desire for consistency, efficacy, and above all, safety in your training. For many, the dream of building serious strength and muscle feels out of reach without access to a fully equipped commercial gym or a dedicated spotter. But what if there was a single piece of equipment that could transform your home space into a personal strength sanctuary, empowering you to push your limits with confidence, regardless of your experience level?
Enter the power rack.
More than just a frame, a power rack is the cornerstone of a serious home gym, offering unparalleled safety, versatility, and the foundational structure needed to unlock your true strength potential. Whether you’re taking your first steps into the world of barbell training or you’re an intermediate lifter striving for new personal bests, understanding how to select, set up, and effectively utilize a power rack can revolutionize your fitness journey.
This comprehensive guide will delve deep into the world of power racks, illuminating their purpose, benefits, and how to harness their full capabilities. We’ll explore everything from choosing the right rack for your space and budget to mastering essential lifts and integrating advanced techniques safely. Prepare to forge not just muscle, but an unbreakable commitment to your lifelong fitness.
What Exactly is a Power Rack? The Heart of Your Strength Sanctuary
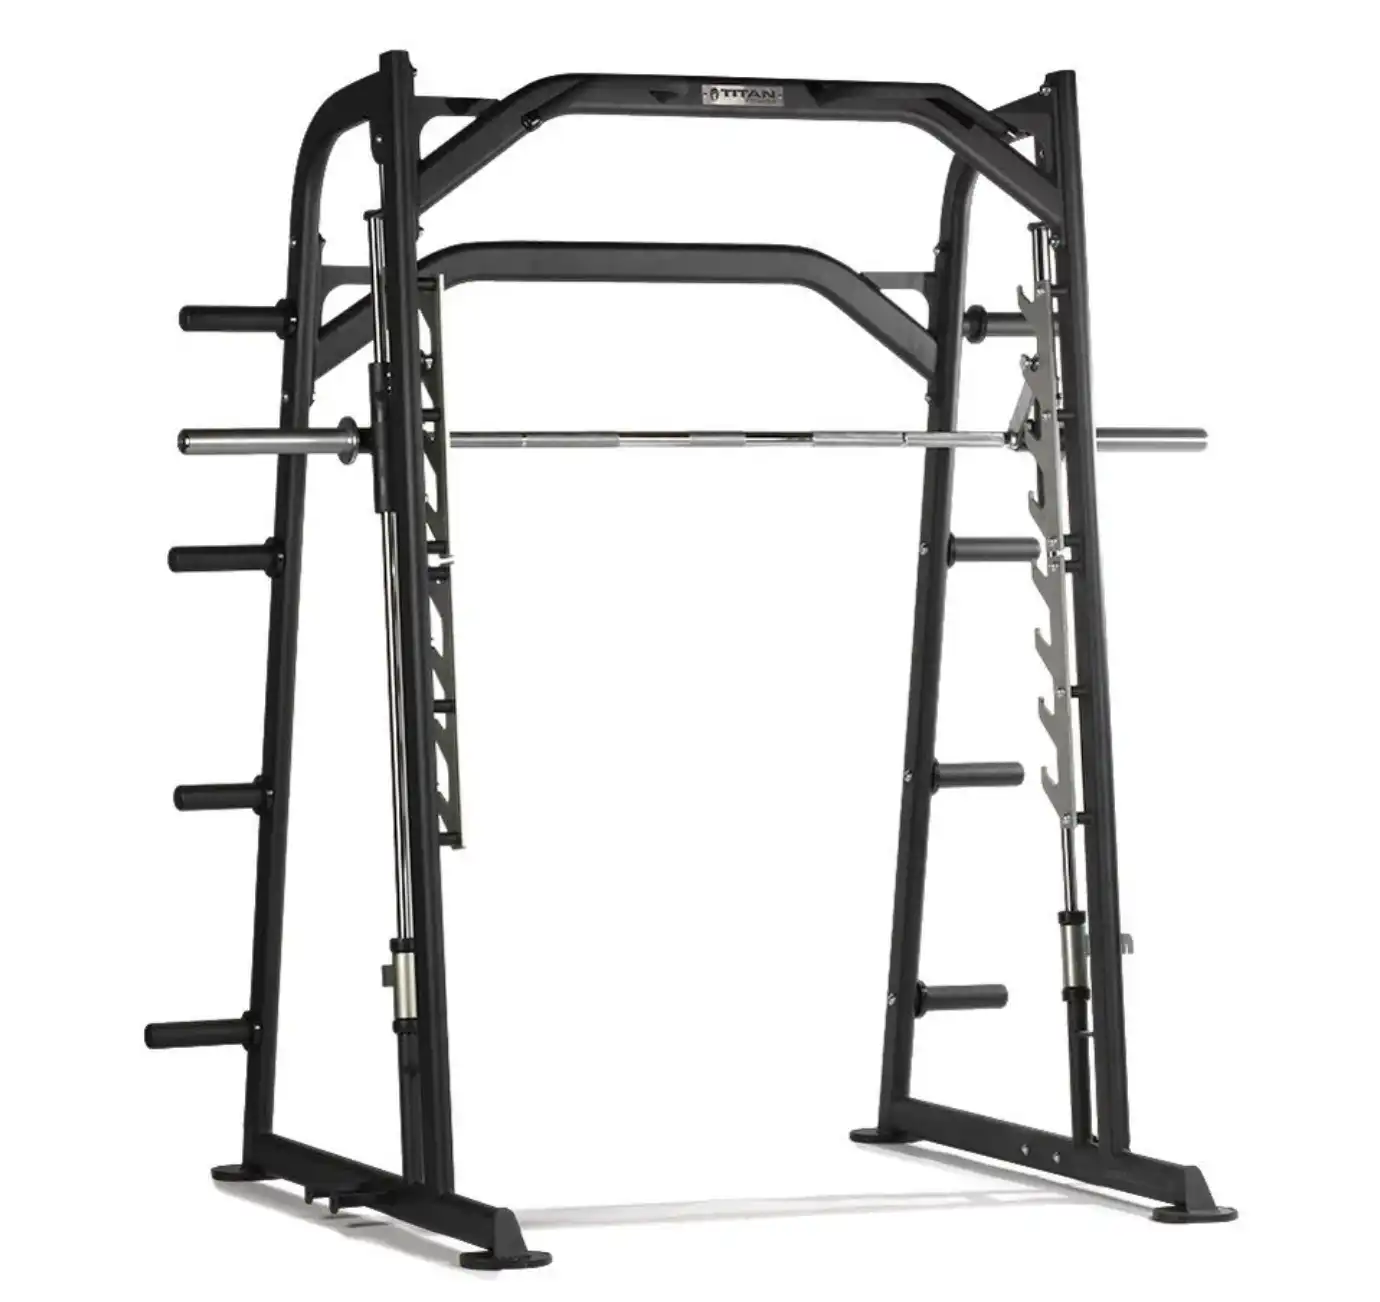
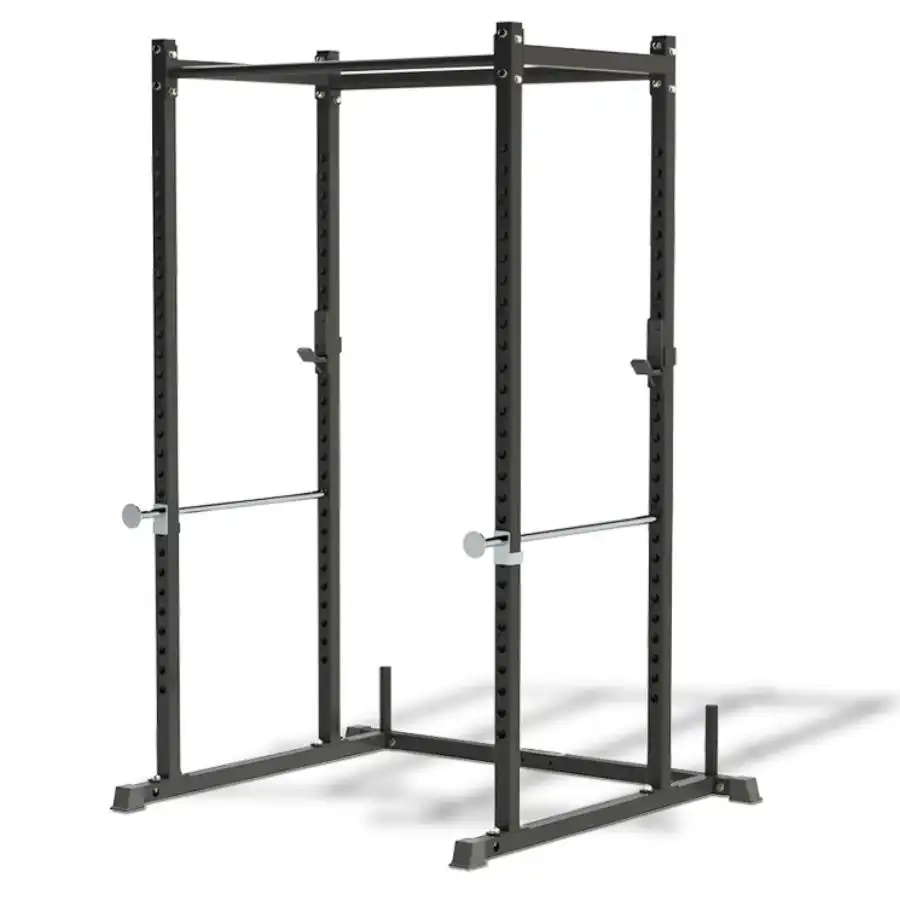
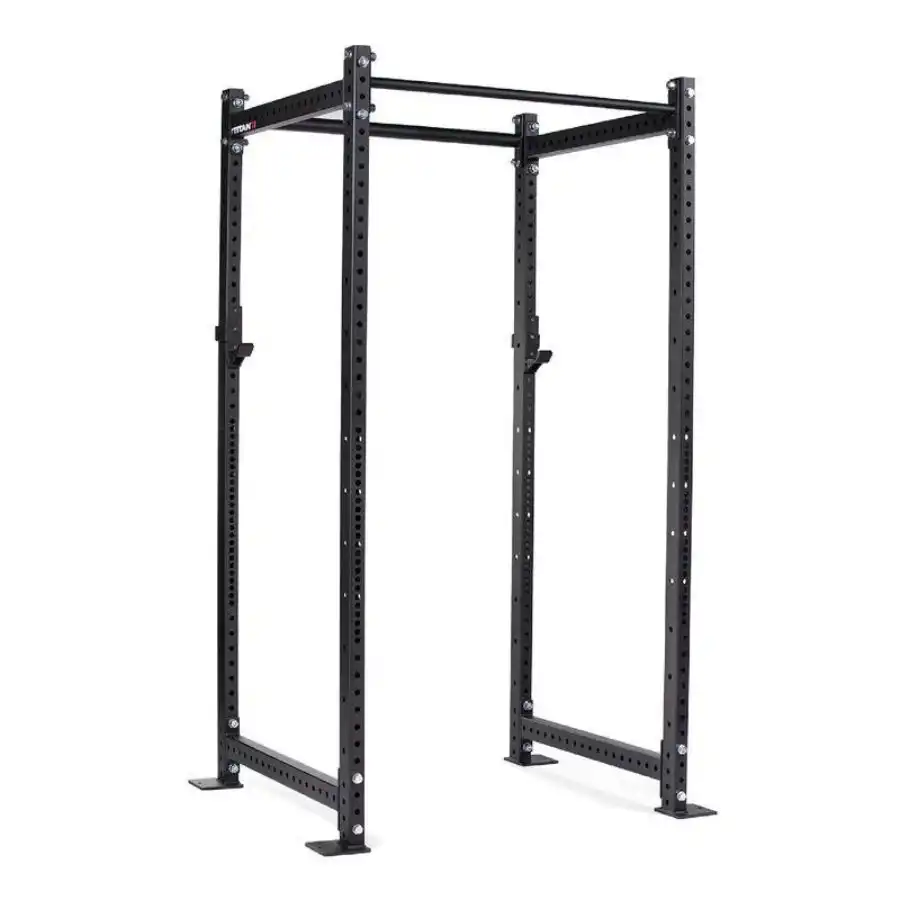
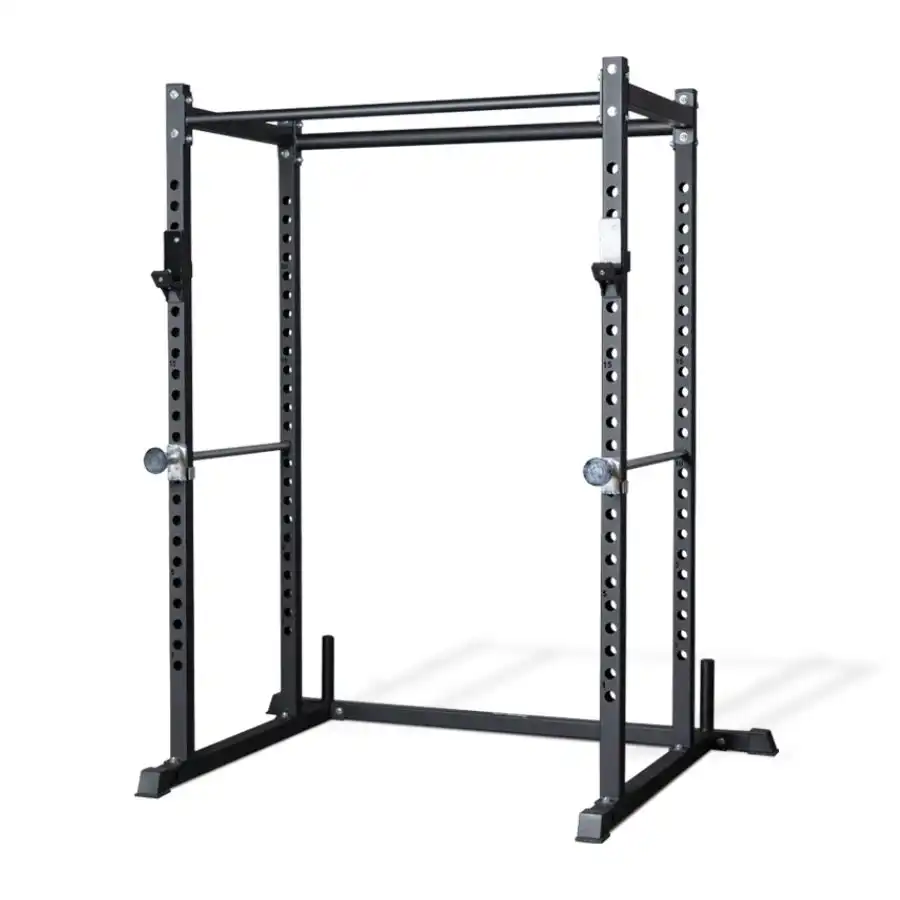
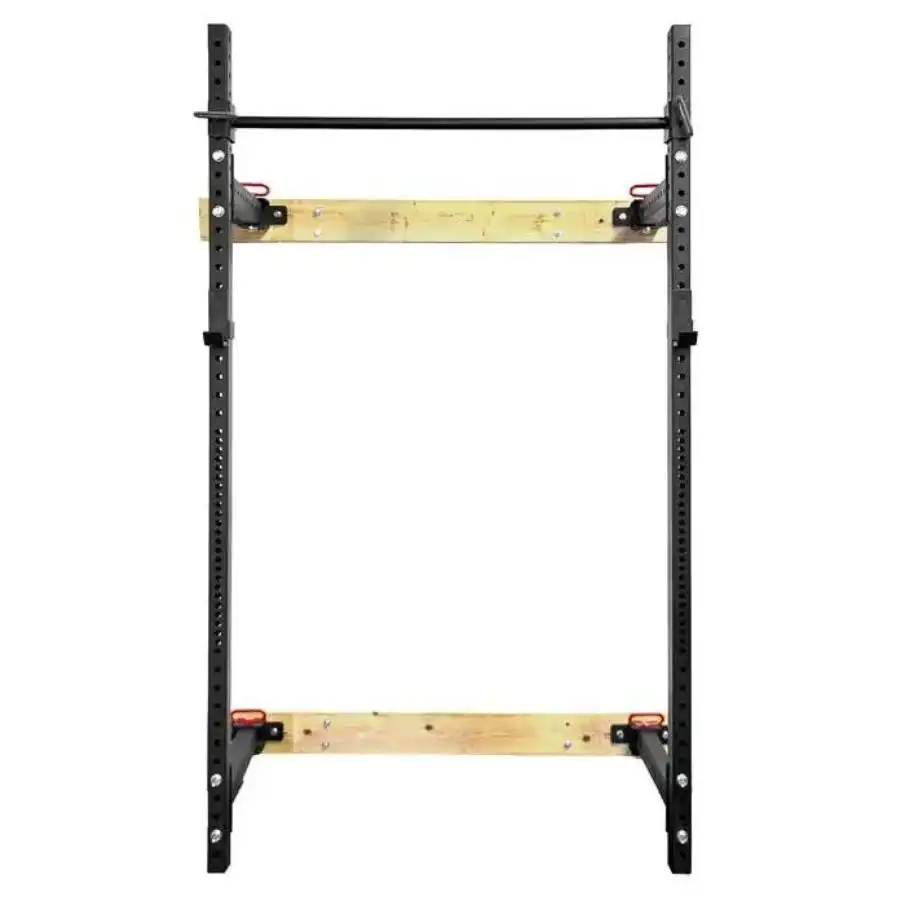
At its core, a power rack, often interchangeably called a power cage or squat cage, is a robust, four-posted steel frame designed to facilitate safe and effective barbell training. Imagine a sturdy, open-sided box constructed from heavy-duty metal uprights connected by horizontal crossmembers. This structure provides a secure environment for performing compound exercises like squats, bench presses, and overhead presses, even when training alone.
Its primary function is safety. Within the rack, adjustable horizontal safety bars, pins, or straps can be positioned at various heights. These "safeties" act as a fail-safe, catching the barbell if you fail a lift, preventing injury and allowing you to push your limits without fear. This critical feature distinguishes it from simpler squat stands, which typically offer only J-hooks for racking the bar but lack the enclosed structure and protective safeties.
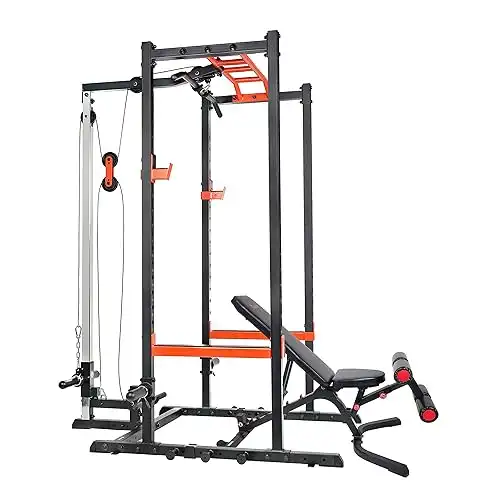
A power rack isn’t just about safety; it’s about versatility. While its name suggests a focus on powerlifting movements, it serves as a central hub for a vast array of strength and conditioning exercises. From bodyweight movements like pull-ups and dips (with appropriate attachments) to resistance band training and even cable work (on models with integrated pulley systems), a well-chosen power rack can support a comprehensive, full-body workout routine.
Anatomy of a Power Rack: Key Components
Understanding the basic parts of a power rack is crucial for selection and effective use:
- Uprights: The vertical steel posts that form the main structure of the rack. They feature numerous holes for adjusting attachments.
- J-Hooks (or J-Cups): These are the hooks that hold the barbell when it’s racked. They are adjustable and typically lined with plastic (UHMW) to protect your barbell’s knurling.
- Safety Systems:
- Pin-Pipe Safeties: Long, hollow steel pipes that pass through holes in the uprights and are secured with pins. Robust and reliable.
- Strap Safeties: Heavy-duty nylon straps that span between two uprights, offering a slightly softer catch for the barbell and reducing wear on the bar itself.
- Spotter Arms: Shorter, external safety arms that extend out from the front of the rack, often used for exercises performed outside the cage.
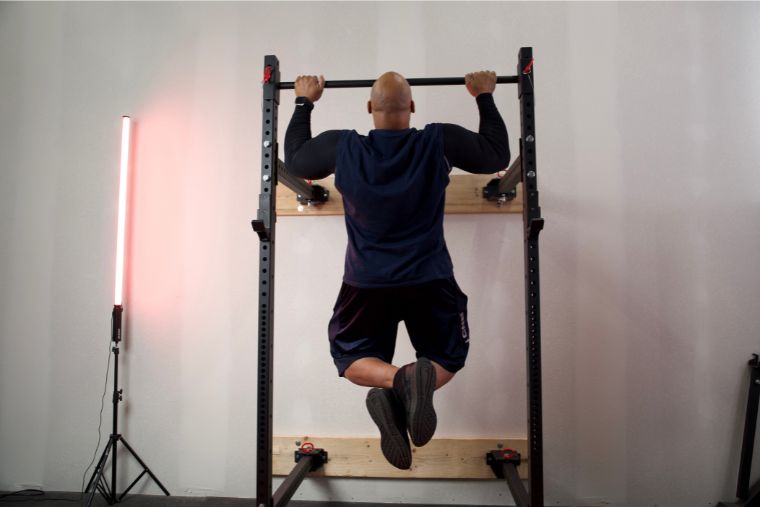
- Pull-Up Bar: A horizontal bar typically integrated into the top crossmember, allowing for various grip pull-ups and chin-ups. Many offer multi-grip options.
- Base: The bottom frame that provides stability. Some racks require bolting down for maximum stability, especially with heavier loads or dynamic movements.
- Hole Spacing: The distance between the holes on the uprights, which dictates how precisely you can adjust J-hooks and safeties.
The Transformative Power of a Power Rack: Why You Need One
Investing in a power rack is more than just buying gym equipment; it’s investing in your long-term fitness, confidence, and overall well-being. Here’s why it stands out as an indispensable tool for beginners and intermediate lifters alike:
Unparalleled Safety for Solo Training
This is arguably the power rack’s most significant advantage. For anyone training alone at home, the fear of failing a heavy lift can be a major deterrent. The safety system of a power rack eliminates this concern entirely. Whether you’re attempting a new personal record on your squat or pushing for those final reps on the bench press, the knowledge that the safeties will catch the bar allows you to train with maximum effort and focus. This psychological safety empowers you to:
- Push Beyond Your Comfort Zone: Without a spotter, it’s natural to hold back. Safeties allow you to challenge your muscles to their true limits.
- Practice "Bailing Out": Knowing how to safely ditch a failed lift (e.g., dropping the bar onto the safeties) is a crucial skill that the rack facilitates.
- Rehabilitation and Deloading: Even during recovery or lighter training phases, the safeties provide peace of mind, ensuring you can train without unnecessary risk.
Versatility Beyond Limits
While often associated with compound barbell movements, a power rack is a multi-gym in disguise. Its open structure and numerous attachment points allow for an incredible array of exercises:
- Barbell Basics: Squats (front, back, Zercher), Bench Press (flat, incline, decline), Overhead Press, Rack Pulls, Pin Squats.
- Bodyweight Mastery: Pull-ups, Chin-ups, Dips (with an attachment), Leg Raises.
- Accessory Work: Rows (pendlay, inverted), Lunges, Step-ups.
- Resistance Band Training: Anchoring bands to the base or uprights for assisted movements, accommodating resistance, or targeted exercises.
- Cable Work (if applicable): Lat pulldowns, tricep pushdowns, cable rows, face pulls, and more, for a complete strength and hypertrophy program.
This versatility means you can build a comprehensive strength program without needing multiple bulky pieces of equipment, making it ideal for compact home gym setups.
Progressive Overload Made Easy
Progressive overload – continually challenging your muscles by increasing the demand placed on them – is the fundamental principle of strength gain. A power rack facilitates this by:
- Allowing Incremental Weight Increases: Safely add weight to your barbell without needing a spotter.
- Facilitating Higher Volume: Push for more reps or sets, knowing you can safely fail.
- Enabling Advanced Techniques: Techniques like partial reps (e.g., pin presses or pin squats from specific heights) can target sticking points and build specialized strength, safely enabled by the adjustable safeties.
Space-Efficiency for Home Gyms
While a power rack might seem large, it condenses the functionality of several pieces of gym equipment into a relatively compact footprint. Instead of needing a separate squat stand, bench press station, and pull-up bar, you get all three (and more) in one integrated unit. Many modern racks also offer plate storage pegs directly on the frame, further maximizing your space.
Long-Term Investment in Health
The benefits of strength training extend far beyond aesthetics. Research consistently links regular resistance exercise to:
- Improved Bone Density: Crucial for preventing osteoporosis as you age.
- Enhanced Metabolic Health: Helps regulate blood sugar and body fat.
- Better Cardiovascular Health: Contributes to a strong heart.
- Increased Functional Strength: Makes everyday tasks easier and reduces injury risk.
- Boosted Mental Well-being: Reduces stress, improves mood, and builds confidence.
A power rack is an investment in these long-term health outcomes, providing a tool that will support your fitness goals for years to come.
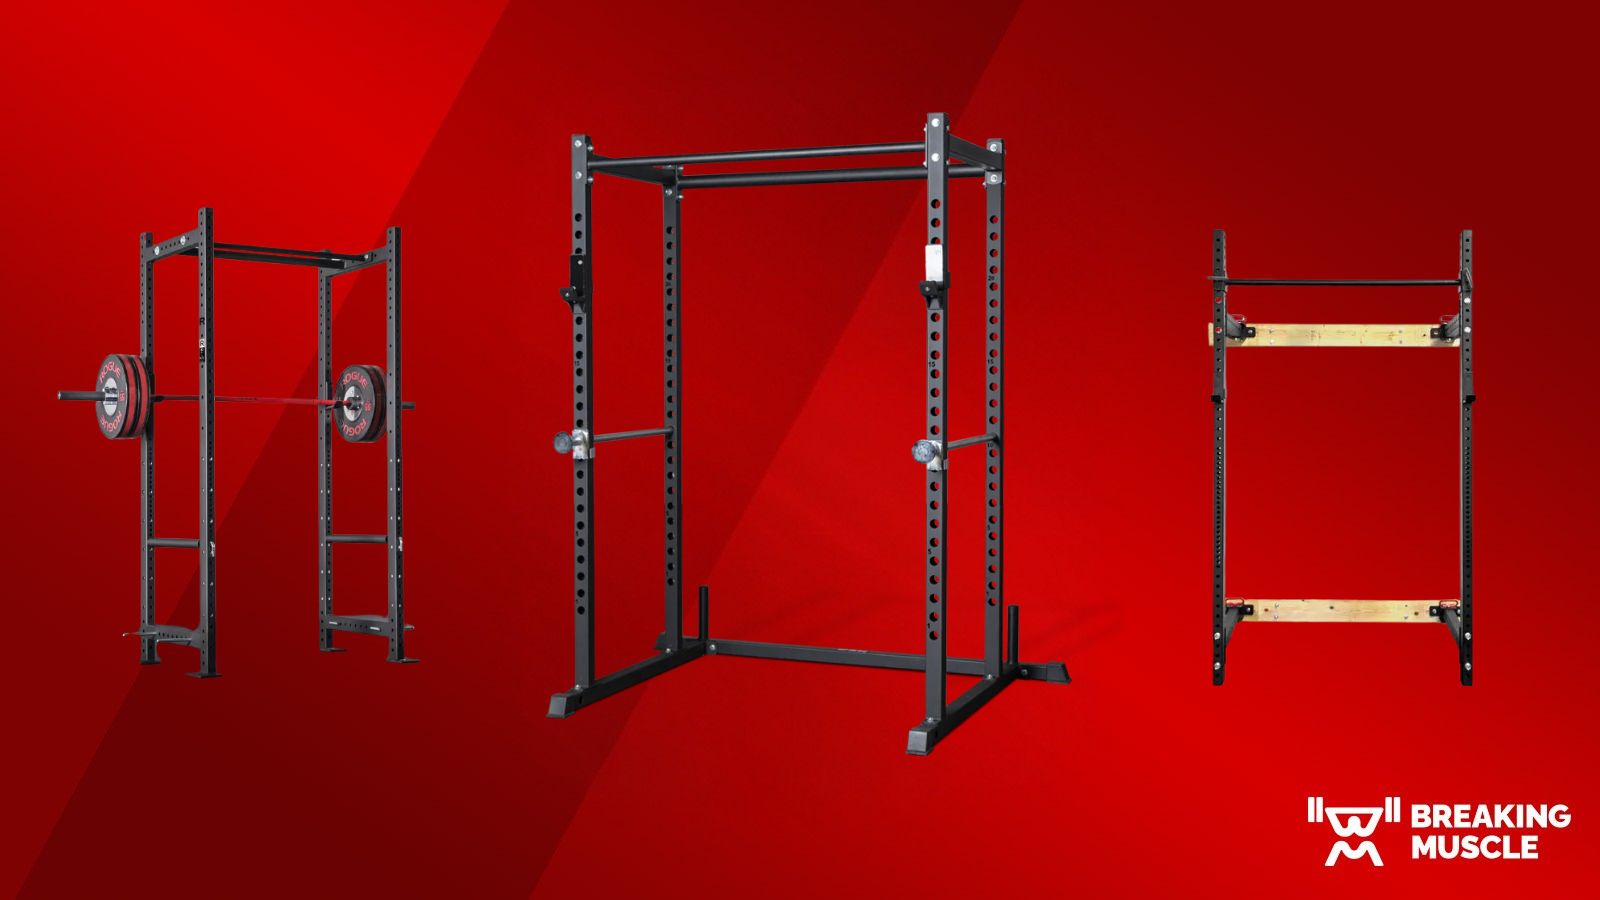
Choosing Your Strength Sanctuary: A Practical Guide to Power Rack Selection
Selecting the right power rack for your home gym involves more than just picking the first one you see. It requires careful consideration of your space, budget, training goals, and the rack’s construction.
Assess Your Space: Dimensions and Clearance
Before anything else, grab a tape measure.
- Height: This is critical, especially if you have low ceilings (basement, garage). Measure from floor to ceiling. Remember to account for overhead clearance if you plan to do pull-ups or overhead presses inside the rack. Most standard racks are around 80-92 inches tall. Short racks (around 72 inches) are available for lower ceilings.
- Footprint (Width & Depth): Measure the floor space you have available. A typical rack footprint is around 45-50 inches wide and 45-60 inches deep. Account for extra space around the rack (at least 2-3 feet on each side and in front) for loading/unloading weights, performing exercises like deadlifts, and general movement.
- Folding Racks: If space is extremely limited, wall-mounted folding power racks are an excellent option, collapsing to just a few inches from the wall when not in use.
Understand Construction & Durability
The quality of construction directly impacts the rack’s stability, weight capacity, and longevity.
- Gauge of Steel: This refers to the thickness of the steel tubing. Lower numbers indicate thicker, stronger steel.
- 11-gauge: Very heavy-duty, commercial-grade. Ideal for serious lifters, high weight capacities, and maximal stability.
- 12-gauge: Still very strong and common for high-quality home gym racks. Suitable for most intermediate lifters.
- 14-gauge: Thinner, often found on more budget-friendly racks. Sufficient for beginners and lighter loads but may exhibit more flex or sway under heavy weight.
- Actionable Advice: For most beginners and intermediate lifters, 12-gauge is a great balance of cost and durability. If you plan on pushing very heavy weight or desire absolute rigidity, 11-gauge is superior.
- Tubing Size: Common sizes are 2×2 inches, 2×3 inches, and 3×3 inches. Larger tubing generally means a stronger, more stable rack. It also affects attachment compatibility (many brands use proprietary attachment systems for their specific tubing sizes).
- Welds and Finish: Look for clean, consistent welds. A high-quality powder-coat finish protects against rust and wear.
- Weight Capacity: Check the manufacturer’s stated weight capacity for the rack itself, as well as for individual components like J-hooks and safeties. Ensure it comfortably exceeds your current and projected lifting maximums.
Essential Features & Customization
The details can significantly enhance your training experience.
- J-Hooks: Ensure they are lined with UHMW plastic or a similar material to protect your barbell’s knurling. Smooth, uncoated metal J-hooks will quickly chew up your bar.
- Safety Systems: Choose between pin-pipe, strap safeties, or spotter arms based on preference and budget. Strap safeties are generally preferred for protecting your barbell’s finish.
- Hole Spacing:
- 2-inch spacing: Standard across most racks.
- Westside Hole Spacing (1-inch spacing): Often found in the bench press and clean pull zones, offering finer adjustments for optimal bar height, especially critical for bench pressing.
- Actionable Advice: If bench press is a priority, Westside spacing in the relevant zone is a definite plus for finding your perfect setup.
- Integrated Pull-Up Bar: Most racks include one. Look for options with multiple grip positions (pronated, supinated, neutral) and varying diameters for grip training.
- Expandability and Attachments: Consider the ecosystem of attachments available for the rack. Common add-ons include:
- Dip stations
- Landmine attachments
- Plate storage pegs
- Lat pulldown/low row attachments
- Band pegs
- Actionable Advice: Even if you don’t need all attachments now, ensuring your rack is compatible with future additions provides long-term value and versatility.
Budgeting for Your Investment
Power racks vary widely in price, from a few hundred dollars to several thousand.
- Entry-Level (Budget-Friendly): Typically 14-gauge steel, 2×2 tubing, basic J-hooks and pin-pipe safeties. Great for beginners, often around $300-$600.
- Mid-Range: Often 12-gauge steel, 2×2 or 2×3 tubing, improved J-hooks, possibly strap safeties, and a good selection of attachments. Excellent value for intermediate lifters, generally $600-$1000.
- High-End (Premium): 11-gauge steel, 3×3 tubing, advanced features like Westside spacing, premium safeties, extensive attachment compatibility, and robust construction. For serious lifters or those wanting commercial-grade equipment, $1000+.
Actionable Advice: Prioritize safety and core stability. A solid, safe rack is more important than a fully loaded one if budget is a concern. You can always add attachments later. Look for brands that offer free shipping, as these heavy items can incur significant delivery costs.
Mastering Your Power Rack: Effective Training Strategies
A power rack is a tool; its effectiveness depends on how you use it. Mastering its operation, especially its safety features, is paramount for a productive and injury-free training experience.
Safety First: Setting Up Your Safeties Correctly
This is non-negotiable. Improperly set safeties negate the primary benefit of the power rack.
- For Squats:
- Place an unloaded barbell on your back (or where you would normally squat).
- Squat down to your deepest comfortable position.
- The safety bars/straps should be set approximately one to two inches (or one hole increment) below your deepest squat position.
- Real-Life Example: If you fail a squat, you should be able to simply sit down, letting the bar rest on the safeties without it crushing you. If the safeties are too low, the bar will still trap you; if they’re too high, they’ll interfere with your full range of motion.
- For Bench Press:
- Lie on the bench with the unloaded barbell in your hands, as if at the bottom of a bench press rep.
- Set the safeties just above your chest, ensuring they are low enough to allow a full range of motion but high enough to prevent the bar from pinning you if you fail.
- Actionable Advice: Experiment with an unloaded bar. You should be able to complete a full rep without hitting the safeties, but if you relax your chest, the bar should rest on the safeties before touching you.
Fundamental Exercises to Build Your Foundation
These compound movements form the backbone of any effective strength program and are perfectly suited for power rack training:
- Barbell Back Squats: The "king of exercises." Targets legs, glutes, and core. Position the bar on your upper back (high bar) or slightly lower (low bar). Use safeties set as described above.
- Barbell Bench Press: Develops chest, shoulders, and triceps. Ensure your bench is centered in the rack and safeties are set correctly.
- Overhead Press (OHP): Builds shoulder and tricep strength. Can be done standing or seated. Set J-hooks at shoulder height.
- Rack Pulls: A variation of the deadlift where the bar starts from safeties set above the floor (e.g., knee height). Great for building upper back and grip strength, and targeting specific deadlift sticking points.
- Pull-Ups/Chin-Ups: Excellent for back, biceps, and grip strength. Use the integrated pull-up bar. Vary your grip for different muscle activation.
- Dips (with attachment): Targets chest, triceps, and shoulders. Ensure dip handles are securely attached and stable.
Incorporating Accessories for a Holistic Workout
Maximize your rack’s versatility with smart accessory choices:
- Resistance Bands: Attach to the base for banded squats or bench press (accommodating resistance), or to the top for assisted pull-ups.
- Landmine Attachment: Allows for dynamic, rotational movements like landmine presses, rows, and rotational core exercises.
- Lat Pulldown/Low Row (if equipped): Essential for comprehensive back development, targeting lats, rhomboids, and traps.
- Core Work: Perform hanging leg raises from the pull-up bar, or various floor exercises within the rack’s footprint.
Progressive Overload Principles: Your Path to Growth
Consistency and intelligent progression are key.
- Increase Weight: The most straightforward method. Aim for small, consistent increases when your form is solid.
- Increase Reps/Sets: If increasing weight isn’t feasible, try adding a rep or an extra set to your routine.
- Decrease Rest Time: Gradually reduce rest periods between sets to increase intensity and work capacity.
- Improve Form: Better technique allows you to lift more weight safely and effectively. Focus on mastering each movement.
- Increase Frequency: As you advance, consider adding an extra training day per week.
Sample Beginner/Intermediate Workout Routine (3-Day Split)
Here’s a basic framework demonstrating how you can utilize your power rack:
Day 1: Lower Body & Core
- Barbell Back Squats: 3 sets of 5-8 reps
- Rack Pulls (from below knee): 3 sets of 6-10 reps
- Barbell Lunges (outside rack): 3 sets of 8-12 reps per leg
- Hanging Leg Raises (pull-up bar): 3 sets of 10-15 reps
- Plank: 3 sets, hold for 30-60 seconds
Day 2: Upper Body (Push)
- Barbell Bench Press: 3 sets of 5-8 reps
- Overhead Press: 3 sets of 6-10 reps
- Dips (with attachment): 3 sets to failure (or 8-12 reps)
- Push-Ups (elevated on safeties for easier version): 3 sets of 10-15 reps
Day 3: Upper Body (Pull) & Arms
- Pull-Ups/Chin-Ups: 3 sets to failure (or 6-10 reps)
- Barbell Rows (outside rack): 3 sets of 8-12 reps
- Bicep Curls (with barbell or dumbbells): 3 sets of 10-15 reps
- Overhead Tricep Extensions (with dumbbell or cable attachment): 3 sets of 10-15 reps
Actionable Advice: Always warm up thoroughly before lifting and cool down afterward. Focus on perfect form before increasing weight. Listen to your body and adjust as needed.
Beyond the Basics: Advanced Applications and Maintenance
As you progress, your power rack can continue to support more advanced training methodologies.
Advanced Techniques (for Intermediate Lifters)
- Partial Reps (Pin Presses/Squats): Set safeties at specific points in the lift to target weak ranges of motion and build strength in those areas.
- Negatives: Focus on the eccentric (lowering) phase of a lift with heavier weight than you can lift concentrically, often with a spotter for the concentric part, or by using the safeties to reset.
- Cluster Sets: Perform a set with brief (10-30 second) rest periods between individual reps or small clusters of reps, allowing for higher volume with heavier loads.
- Isometric Holds: Hold a heavy weight at a specific point in a lift against the safeties to build static strength.
Keeping Your Rack in Top Condition
Regular maintenance ensures safety and longevity.
- Cleanliness: Wipe down your rack regularly to prevent rust and keep it looking new.
- Bolt Check: Periodically inspect all bolts and nuts, tightening any that have come loose from vibrations during training.
- Safety Inspection: Always check J-hooks, safeties, and attachment points for wear, cracks, or damage before each session. Replace worn components immediately.
- Floor Protection: If not bolting down, consider rubber flooring or thick mats to protect your floor and provide a stable base.
Realizing Your Potential: The Power Rack as Your Partner
The power rack is more than just metal and bolts; it’s an enabler. It removes excuses, provides a safe environment for challenge, and stands ready to support every step of your strength journey. It empowers you to train on your schedule, at your intensity, and with the peace of mind that allows for true progress.
Imagine the satisfaction of hitting a new squat personal record, knowing you built that strength safely, consistently, and on your terms. Visualize the confidence that comes from mastering complex movements and seeing tangible results. This isn’t just about lifting heavy; it’s about building resilience, discipline, and a profound connection with your physical capabilities.
Whether you’re aiming to build foundational strength, pack on muscle, enhance athletic performance, or simply maintain a robust, healthy body for years to come, the power rack is your unwavering partner. It demands effort, but in return, it offers unparalleled rewards – a stronger body, a more confident mind, and a lifelong commitment to your fitness.
Conclusion: Your Strength Awaits
Your fitness journey is a marathon, not a sprint. It requires dedication, smart training, and the right tools. A power rack provides that essential foundation, transforming any space into a personal training arena where safety and progress are paramount. By understanding its capabilities, choosing wisely, and committing to consistent, intelligent training, you are not just buying a piece of equipment; you are investing in a lifetime of strength, health, and empowered living.
Step into your power rack, embrace the challenge, and forge the strongest version of yourself. Your strength awaits.
FAQs
Q: What is the difference between a squat rack and a power rack?
A: A squat rack (or squat stand) typically consists of two uprights and J-hooks for racking a barbell, providing a basic station for squats. A power rack (or power cage) is a larger, enclosed four-post structure with additional crossmembers. Its key advantage is the integrated safety bars/straps that run horizontally between the posts, offering a critical fail-safe for heavy lifts, which most squat racks lack. Power racks are also generally more versatile with more attachment options.
Q: How should I bolt down my power rack?
A: Bolting down a power rack provides maximum stability and safety, especially if you plan to lift heavy, use a lat pulldown attachment, or perform dynamic movements like kipping pull-ups. Always follow the manufacturer’s specific instructions, as the process can vary. Generally, it involves drilling into a concrete floor using appropriate anchor bolts. If you cannot bolt down, choose a rack with a heavy, stable base, and consider adding weight plates to storage pegs for extra stability.
Q: How far from the wall should a power rack be?
A: For freestanding power racks, aim for at least 2-3 feet of clearance from the wall on all sides. This space allows for comfortable loading and unloading of weight plates, performing exercises outside the rack (like deadlifts or rows), and safely bailing out of lifts. For wall-mounted folding racks, the clearance needed is primarily in front of the rack when extended, allowing for full range of motion during exercises. Always refer to your rack’s specific dimensions and recommended clearances.
Q: What gauge steel should a power rack be?
A: Steel gauge refers to the thickness of the steel tubing, with lower numbers indicating thicker, stronger steel.
- 11-gauge: The thickest and strongest, offering commercial-grade durability and minimal flex. Ideal for advanced lifters and high-load capacity.
- 12-gauge: A very strong and common choice for quality home gym racks, providing an excellent balance of strength and affordability for most intermediate lifters.
- 14-gauge: Thinner and typically found on more budget-friendly racks. Suitable for beginners and lighter lifting but may show more movement under heavy loads.
The best gauge for you depends on your budget and anticipated lifting intensity.