The pursuit of strength is a deeply personal and incredibly rewarding journey. Whether you’re taking your first tentative steps into the world of weightlifting or you’re an intermediate lifter striving to smash through plateaus, one piece of equipment stands as a cornerstone for safe, effective, and progressive training: the power rack. Often seen as the heart of any serious home gym or a fundamental component in a commercial facility, the power rack isn’t just a collection of steel uprights; it’s a sanctuary for strength, a silent spotter, and a versatile platform for building an unbreakable physique.
In an age of endless fitness fads, the power rack remains a timeless testament to fundamental strength principles. It empowers you to tackle compound movements with confidence, push your limits without fear, and unlock a consistent path to progressive overload. This comprehensive guide will explore why the power rack is indispensable for beginners and intermediate enthusiasts alike, how to harness its full potential, and how to integrate it into a sustainable, results-driven fitness regimen. Prepare to discover how this robust structure can transform your training, safeguard your efforts, and help you forge the strongest version of yourself.
Why the Power Rack is Your Ultimate Training Partner
For anyone serious about sustainable strength development, a power rack offers a suite of benefits that go far beyond simply holding a barbell. It’s an investment in safety, versatility, and long-term progress.
Unparalleled Safety for Solo Training
One of the most significant advantages of a power rack, especially for home gym users or those training without a dedicated spotter, is its inherent safety features. The adjustable safety pins, straps, or spotter arms act as a protective barrier, catching the barbell if you fail a lift. This allows you to:

- Push your limits with confidence: No more guessing if you can complete that last rep. The safeties provide a psychological safety net, encouraging you to challenge yourself without the fear of being pinned under heavy weight.
- Practice technique with heavy loads: You can perform lifts with heavier weights, knowing you can bail safely if your form falters, allowing you to perfect your mechanics under load.
- Train to failure intelligently: For certain exercises and training goals, pushing a set to absolute muscular failure can be beneficial. The power rack makes this a viable and safe option.
Versatility for a Full-Body Arsenal
A power rack is far more than just a squat station. Its modular design and numerous attachment points transform it into a multi-functional gym within a compact footprint. With a power rack, you can effectively train every major muscle group through a diverse range of exercises:
- Compound movements: Squats, bench presses, overhead presses, rack pulls, and rows are all foundational lifts that thrive within the rack.
- Bodyweight exercises: Many racks come equipped with a pull-up bar, opening up exercises like pull-ups, chin-ups, and hanging leg raises.
- Accessory work: With optional attachments (like dip bars, landmine attachments, or resistance band pegs), you can perform dips, various presses and rows, and add accommodating resistance to your main lifts.
- Isolation exercises: Even bicep curls, tricep extensions, or calf raises can be performed more safely and effectively using the rack’s stability.
The Engine of Progressive Overload
Progressive overload – the gradual increase in stress placed on the body during training – is the fundamental principle of strength and muscle growth. The power rack is an ideal tool for facilitating this:
- Precise weight increments: You can consistently add small amounts of weight to the bar, ensuring steady, measurable progress.
- Repetition and set manipulation: The stable environment allows you to focus on increasing reps or sets with a given weight.
- Time under tension: Safeties allow for controlled negative repetitions or isometric holds, increasing the challenge.
- Overcoming plateaus: Techniques like pin presses or rack pulls allow you to train specific sticking points in a lift, helping you break through strength plateaus.
Cultivating Discipline and Consistency
Having a dedicated space for serious lifting, especially in a home gym setting, can significantly boost your training consistency. The presence of a power rack serves as a constant reminder of your fitness goals and a ready invitation to train. It eliminates excuses related to gym commutes, crowded equipment, or inconvenient hours, fostering a disciplined approach to your strength journey.
Deconstructing Your Strength Sanctuary: Understanding Power Rack Components
To truly leverage your power rack, it’s essential to understand its core components and how they contribute to your training. While designs vary, the fundamental elements remain consistent.
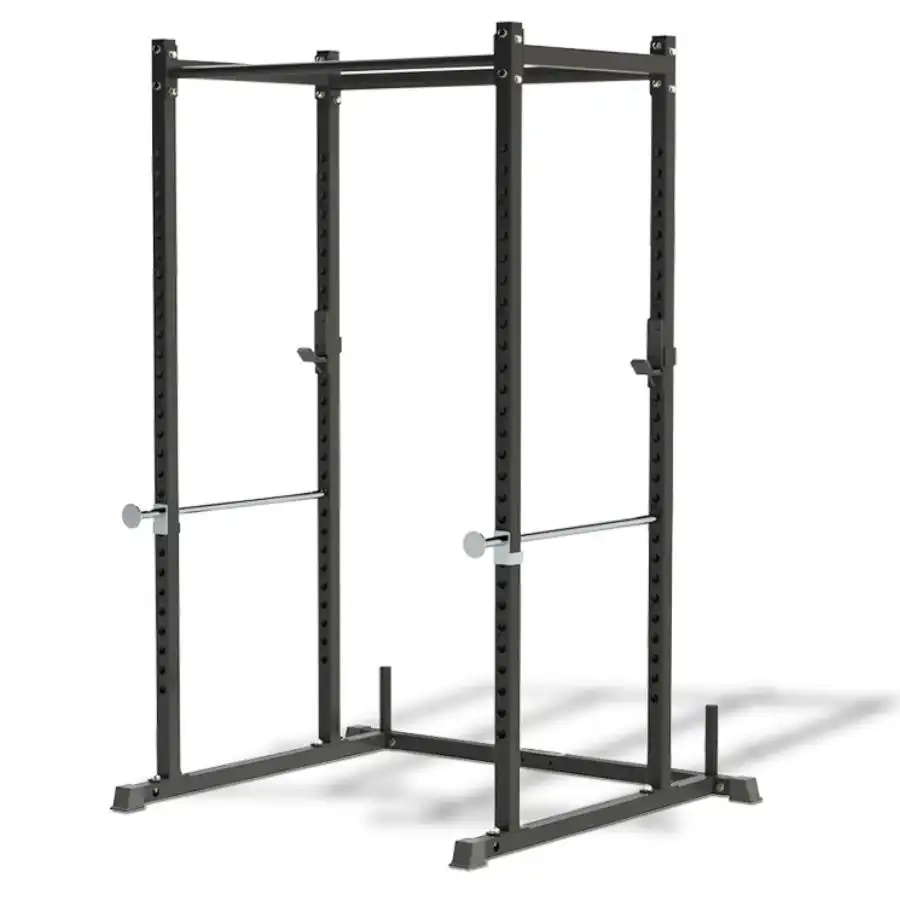
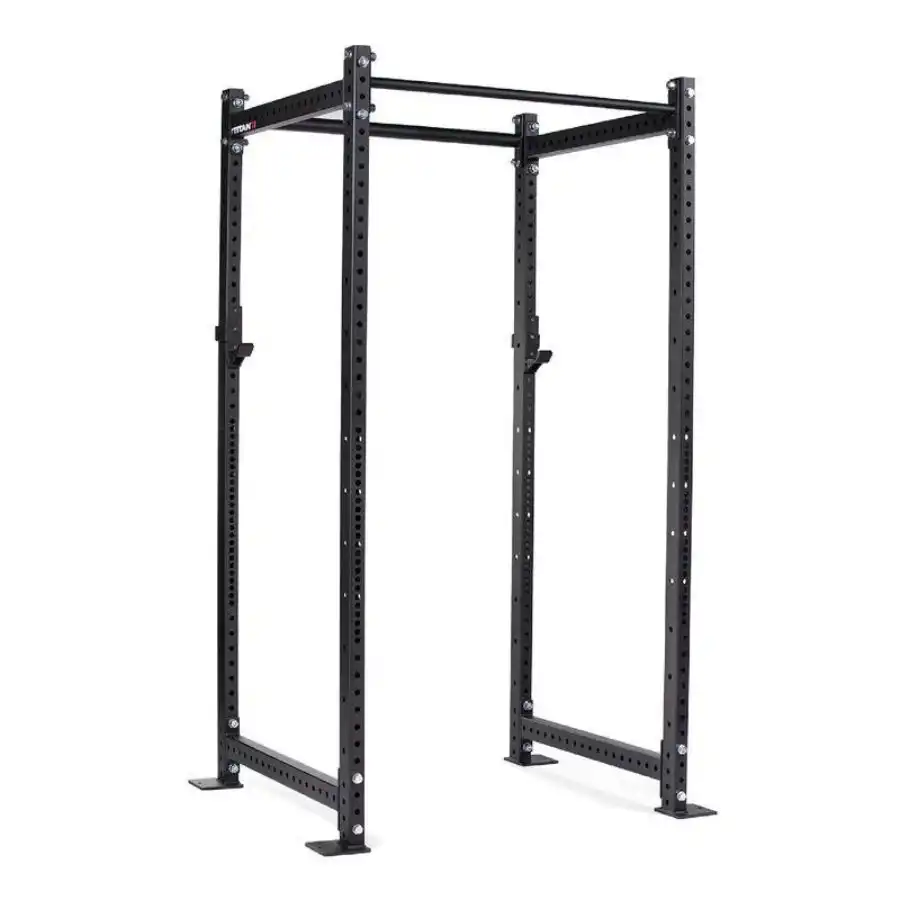
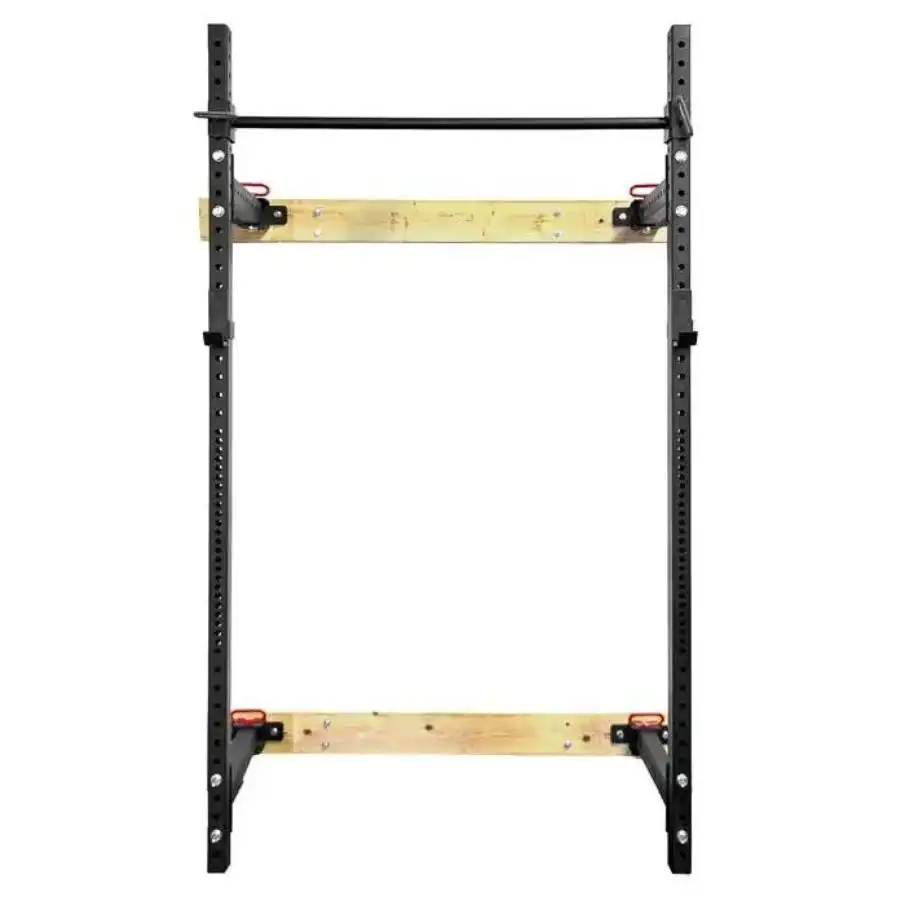
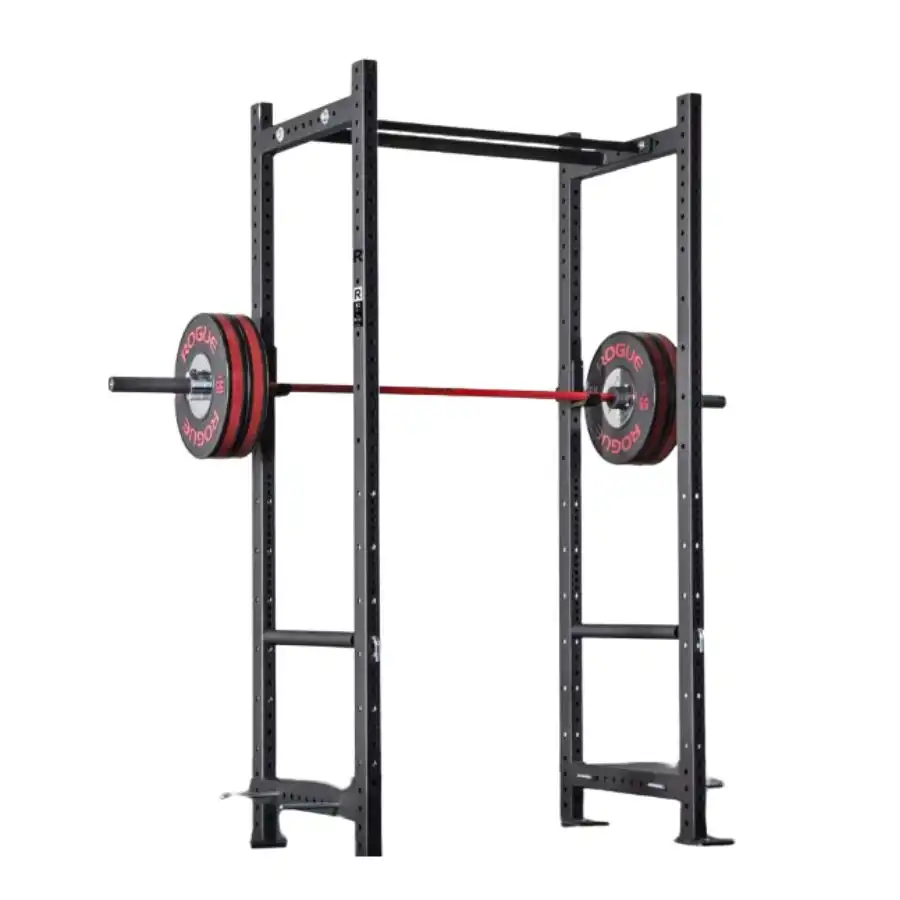
The Uprights: Your Vertical Foundation
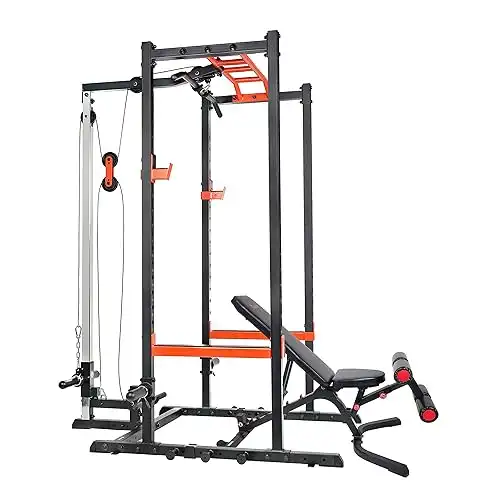
These are the main vertical posts of the rack, typically made of heavy-gauge steel. They feature a series of holes or slots (often numbered) that allow for adjustable positioning of J-hooks and safety mechanisms.
- Hole Spacing: This refers to the distance between the holes on the uprights.
- Standard (2-inch) spacing: Common for general use.
- Westside (1-inch) spacing: Often found in the bench press and squat zones, allowing for finer adjustments, crucial for dialing in bar height for optimal form and safety.
- Gauge of Steel: Lower gauge numbers (e.g., 11-gauge) indicate thicker, stronger steel, capable of handling heavier loads and offering greater stability. Higher gauge numbers (e.g., 14-gauge) are typically found in more budget-friendly or lighter-duty racks.
J-Hooks: Your Barbell’s Resting Place
These adjustable hooks cradle your barbell, allowing you to set the starting height for various lifts. Most J-hooks feature a protective lining (often plastic or UHMW) to prevent damage to your barbell’s knurling and finish.
- Proper Placement: Crucial for safety and efficiency. For squats, the bar should be just below shoulder height. For bench press, it should be within easy reach from a lying position, allowing you to unrack with straight arms and minimal effort.
Safety Mechanisms: Your Lifeline
These are the most critical safety features of a power rack, designed to catch the barbell if you fail a lift.
- Pin-and-Pipe Safeties: Traditional and robust, consisting of a solid pin inserted through the uprights, with a steel pipe sliding over it.
- Strap Safeties: Heavy-duty nylon straps that loop through the uprights. They offer a slightly softer catch, which can be gentler on your barbell and reduce noise. They are also excellent for uneven bailouts.
- Spotter Arms (or Safety Spotter Arms): Shorter, external arms that extend outwards from the rack, providing a safety net for exercises performed outside the main cage, like heavy overhead presses.
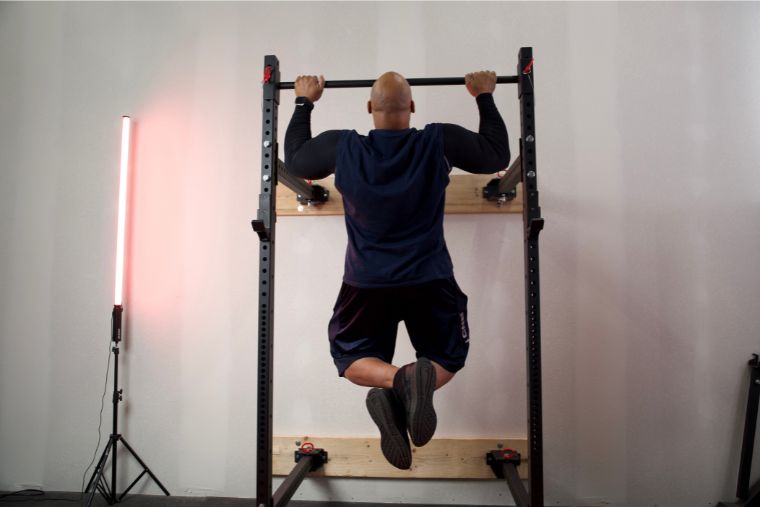
Pull-Up Bar: Your Gateway to Upper Body Dominance
Most power racks include at least one pull-up bar, often integrated into the top cross-members. These can vary in diameter (thicker bars challenge grip more) and grip options (straight, multi-grip, neutral grip).
Other Common Features:
- Weight Storage Pegs: Protruding pins on the rear or sides of the rack to store weight plates, helping keep your gym tidy and adding stability to the rack.
- Resistance Band Pegs: Small pins on the base of the rack that allow you to attach resistance bands for accommodating resistance (making lifts harder at the top) or assistance (making lifts easier at the bottom).
Essential Exercises: Unleashing Your Power Rack’s Potential
The power rack truly shines when used for compound, multi-joint exercises that recruit large muscle groups and build foundational strength. Here’s a breakdown of key movements and how to execute them effectively and safely within your rack.
1. Barbell Back Squat
The king of lower body exercises, the back squat builds powerful legs, glutes, and a strong core.
- Rack Setup: Set J-hooks just below shoulder height. Safeties should be set to catch the bar if you fail, typically an inch or two below your lowest squat position.
- Execution:
- Step under the bar, positioning it across your upper back (traps).
- Grip the bar firmly, unrack, and take 1-2 steps back.
- Feet shoulder-width apart, toes slightly out. Initiate the squat by pushing your hips back and bending your knees, as if sitting into a chair.
- Keep your chest up, back straight, and core braced. Descend until your thighs are parallel to the floor (or deeper, if mobility allows).
- Drive through your heels to stand back up, squeezing your glutes at the top.
- Safety Tip: Always respect the safeties. If you feel you can’t complete a rep, simply lower the bar onto the safeties.
2. Barbell Bench Press
A cornerstone for chest, shoulders, and tricep development.
- Rack Setup: Set J-hooks so the bar is easily reachable with straight arms when lying on the bench. Safeties should be set just above your chest, allowing a full range of motion but preventing the bar from crushing you if you fail.
- Execution:
- Lie on a bench inside the rack, eyes directly under the bar.
- Grip the bar slightly wider than shoulder-width.
- Unrack the bar, extend your arms, and stabilize.
- Lower the bar slowly and controlled to your mid-chest, keeping elbows tucked slightly.
- Press the bar back up powerfully until arms are fully extended.
- Safety Tip: Never bench press without safeties or a spotter, especially when pushing heavy weights.
3. Barbell Overhead Press (Standing)
An incredible exercise for shoulder strength and stability, engaging the entire upper body and core.
- Rack Setup: Set J-hooks at upper chest/shoulder height. Safeties can be set slightly below this, mainly for psychological comfort or if you plan to do push presses.
- Execution:
- Unrack the bar, holding it at shoulder height with an overhand grip, elbows slightly forward.
- Brace your core, squeeze your glutes, and press the bar directly overhead until your arms are fully extended and the bar is over your head.
- Lower the bar back to the starting position with control.
- Safety Tip: If you fail an overhead press, push the bar forward and let it crash to the safeties or the floor in front of you.
4. Rack Pulls
A partial deadlift variation performed within the rack, excellent for targeting the upper back, traps, and improving deadlift lockout strength.
- Rack Setup: Set safeties at a height where the bar starts from mid-shin, just below the knees, or at knee height, depending on your goal.
- Execution:
- Stand with the bar over your mid-foot.
- Hinge at your hips, keeping your back straight, and grab the bar with an overhand or mixed grip.
- Lift the bar by extending your hips and knees, pulling your shoulders back at the top.
- Lower the bar back to the safeties with control.
- Benefit: Allows you to overload specific parts of the deadlift range of motion, addressing weak points.
5. Pull-Ups / Chin-Ups
Bodyweight staples for back and bicep development, utilizing the integrated pull-up bar.
- Rack Setup: Ensure the pull-up bar is secure.
- Execution (Pull-up):
- Grab the bar with an overhand grip, hands slightly wider than shoulder-width.
- Hang with arms fully extended.
- Pull yourself up until your chin clears the bar, squeezing your shoulder blades.
- Lower yourself back down with control.
- Execution (Chin-up): Same as pull-up, but with an underhand grip (palms facing you), which emphasizes biceps more.
- Progression: Use resistance bands for assistance, or add weight with a dip belt for advanced lifters.
6. Dips (with Dip Attachment)
An excellent exercise for triceps, chest, and shoulders if your rack has a dip attachment.
- Rack Setup: Securely attach dip handles to the uprights at a comfortable height.
- Execution:
- Grip the handles, support your weight with straight arms.
- Lean slightly forward (for chest emphasis) or stay upright (for triceps emphasis).
- Lower your body by bending your elbows until your shoulders are below your elbows.
- Push back up to the starting position.
Safety First: Mastering Your Power Rack
While a power rack inherently enhances safety, knowing how to use it correctly is paramount.
Correctly Setting Your Safeties
This is non-negotiable. Your safeties are your last line of defense.
- For Squats: Place an unloaded barbell on your back and squat to your deepest comfortable depth. The safeties should be set 1-2 inches below that lowest point. This ensures you can hit full depth but the bar will be caught if you fail.
- For Bench Press: Lie on the bench. The safeties should be set just above your chest, allowing a full range of motion but preventing the bar from touching your body if you fail. Test this with an unloaded bar.
- Always Test: Before loading heavy weight, do a few practice reps with an unloaded bar to ensure your J-hooks are at the correct height and your safeties will catch the bar if needed.
Warming Up and Cooling Down
Essential for preventing injury and optimizing performance.
- Warm-up: Begin with 5-10 minutes of light cardio (jogging, cycling) to elevate heart rate. Follow with dynamic stretches targeting the muscles you’ll be working (e.g., leg swings, arm circles, bodyweight squats before squatting).
- Cool-down: After your workout, perform static stretches (holding stretches for 20-30 seconds) to improve flexibility and aid recovery.
Listening to Your Body and Avoiding Ego Lifting
The power rack makes it easy to push limits, but wisdom dictates caution.
- Form Over Weight: Always prioritize perfect form over lifting heavier weight. Bad form leads to injury, not progress.
- Progressive, Not Excessive: Slowly increase weight, reps, or sets over time. Don’t jump to weights you’re not ready for.
- Rest and Recovery: Allow adequate rest between workouts for muscle repair and growth. Overtraining is counterproductive.
- Don’t Ignore Pain: Sharp, sudden pain is a warning sign. Stop the exercise and assess. Muscle soreness is normal; joint pain is not.
Building Your Power Rack Workout Program
A power rack is a tool; a well-structured program is the blueprint for your strength journey. Here’s how to approach programming for beginners to intermediate lifters.
Core Principles of Effective Training
- Progressive Overload: As discussed, this is the main driver of adaptation. Continuously challenge your muscles.
- Consistency: Show up regularly. Even a suboptimal workout is better than no workout.
- Specificity: Train for your goals. If you want to get stronger at squats, you need to squat.
- Recovery: Muscles grow outside the gym. Prioritize sleep, nutrition, and stress management.
- Variation (Intelligent): While consistency is key, occasional, minor changes to exercises, sets, or reps can prevent plateaus and keep training fresh.
Sample Program Structure: Full Body Focus (3 Days/Week)
For beginners and many intermediate lifters, a full-body workout performed 3 times a week (e.g., Monday, Wednesday, Friday) is highly effective. It allows for frequent practice of fundamental movements and ample recovery.
Workout A:
- Barbell Back Squat: 3 sets of 5-8 reps
- Barbell Bench Press: 3 sets of 6-10 reps
- Rack Pulls (from below knee): 3 sets of 5-8 reps
- Pull-Ups / Lat Pulldowns (if attachment available): 3 sets of 6-12 reps
- Overhead Tricep Extension (with dumbbell or resistance band): 3 sets of 10-15 reps
Workout B:
- Barbell Front Squat or Goblet Squat: 3 sets of 8-12 reps
- Barbell Overhead Press: 3 sets of 6-10 reps
- Bent-Over Barbell Rows: 3 sets of 8-12 reps
- Dips (or Push-Ups): 3 sets of as many reps as possible (AMRAP)
- Bicep Curls (with barbell or dumbbells): 3 sets of 10-15 reps
Schedule Example:
- Monday: Workout A
- Tuesday: Rest/Active Recovery
- Wednesday: Workout B
- Thursday: Rest/Active Recovery
- Friday: Workout A (next week, start with Workout B)
- Weekend: Rest/Active Recovery
Rep and Set Schemes for Different Goals
- Strength: Typically lower reps (1-6) with heavier weights, fewer sets (3-5). Focus on compound movements.
- Hypertrophy (Muscle Growth): Moderate reps (6-12) with moderate weights, more sets (3-4). Focus on compound and isolation movements.
- Endurance: Higher reps (12+) with lighter weights, moderate sets (2-3).
Actionable Advice for Tracking Progress
- Workout Journal: Keep a detailed log of every workout: exercises, sets, reps, and weight lifted. This is your roadmap for progressive overload.
- Small Increments: Don’t be afraid to add just 2.5-5 lbs to the bar. These small, consistent increases add up significantly over time.
- Focus on One Variable: If you hit your target reps for a given weight, increase the weight next time. If you can’t increase weight, try to do one more rep with the same weight.
- Video Yourself: Occasionally record your lifts. This is invaluable for identifying form breakdown and making corrections.
- Deload Weeks: Every 4-8 weeks, consider a deload week where you reduce volume (sets/reps) and/or intensity (weight) by 40-60%. This allows your body to recover fully and can prevent burnout and injury.
Optimizing Your Power Rack Experience
Beyond the basics, a few considerations can further enhance your power rack training.
Smart Accessory Choices (General Types)
While the power rack itself is powerful, certain additions can expand its capabilities.
- Adjustable Weight Bench: Essential for bench press, dumbbell rows, incline presses, and other exercises.
- Olympic Barbell and Weight Plates: The core tools for loading your rack. Invest in quality plates and a barbell that can withstand your lifting demands.
- Resistance Bands: Versatile for warm-ups, stretching, adding accommodating resistance to lifts, or providing assistance for pull-ups.
- Dip Attachment: If not integrated, a bolt-on dip station can add a great upper body exercise.
- Landmine Attachment: Allows for dynamic rotational movements, presses, and rows, adding another dimension to your training.
- Chalk: Improves grip, especially for heavier lifts like deadlifts and pull-ups.
Maintaining Your Equipment
A power rack is built to last, but proper care ensures its longevity and safety.
- Regular Cleaning: Wipe down the rack, J-hooks, and safeties regularly to remove sweat and chalk build-up.
- Inspect for Wear: Periodically check all bolts, pins, and attachments for tightness or signs of wear and tear. Tighten loose bolts and replace any damaged components.
- Lubrication (if applicable): If your rack has moving parts (like a pulley system), ensure they are lubricated as per manufacturer instructions.
The Mindset of the Lifter
The mental game is as crucial as the physical one.
- Embrace the Challenge: Every workout is an opportunity to improve. See difficult sets as a chance to grow stronger, both physically and mentally.
- Celebrate Small Victories: Hitting an extra rep, adding a small amount of weight, or perfecting your form are all wins. Acknowledge them.
- Patience and Persistence: Strength building is a marathon, not a sprint. There will be good days and bad days. Stay consistent, trust the process, and results will follow.
- Community and Learning: Engage with other lifters online or in person. Learn from experienced individuals, share your journey, and stay inspired.
Conclusion: Your Unbreakable Strength Journey Begins Here
The power rack is more than just a piece of gym equipment; it’s a commitment to your strength, safety, and continuous growth. For beginners, it provides the secure foundation needed to learn fundamental movements without fear. For intermediate lifters, it offers the versatility and robustness to push boundaries, break plateaus, and sculpt a truly powerful physique.
By understanding its components, mastering essential exercises, prioritizing safety, and following a structured program, you transform this steel structure into your personal strength sanctuary. It will stand as a silent witness to your struggles and your triumphs, a testament to your discipline, and a constant invitation to become stronger than you were yesterday.
Embrace the journey. Step into your power rack with purpose, lift with intention, and watch as you forge not only an unbreakable body but an unbreakable spirit. Your strength is waiting to be unleashed. Go build it.