
Think your core is a fortress of strength? You might be surprised. Many fitness enthusiasts fall into the trap of focusing solely on crunches and sit-ups, believing that endless repetitions equate to a rock-solid midsection. While these exercises have their place, they often target only one crucial aspect of core function: trunk flexion. This narrow approach can leave significant gaps in your core’s true capabilities, particularly in its ability to stabilize and brace your body under tension.
This is where a seemingly simple, yet profoundly challenging, exercise comes into play: the hollow hold. Often a cornerstone for gymnasts and athletes who demand exceptional control and posture, the hollow hold is your gateway to mastering core bracing – a fundamental skill that underpins almost every physical movement you make.
We’re not just talking about aesthetics here. A truly strong core translates to better performance in your workouts, reduced risk of injury, and improved everyday functionality. Forget the superficial ab exercises that can lead to sloppy form as fatigue sets in. It’s time to dive deep into an exercise that builds genuine, resilient core strength.
Let’s dissect the nuances of the hollow hold and ensure you’re not just performing an exercise, but truly unlocking your core’s potential.
The Anatomy of a Powerful Core
Before we dive into the mechanics of the hollow hold, it’s essential to understand what your "core" truly encompasses. It’s not just your six-pack. Your core is a complex network of muscles that work synergistically to stabilize your spine, pelvis, and shoulders. This includes:
- The Rectus Abdominis: The "six-pack" muscles, responsible for flexing the spine (like in a crunch).
- The Transverse Abdominis: The deepest abdominal muscle, acting like an internal corset, crucial for bracing and stabilizing.
- The Obliques (Internal and External): Muscles on the sides of your torso, responsible for rotation and side bending.
- The Erector Spinae: Muscles running along your spine, responsible for extending and stabilizing your back.
- The Pelvic Floor Muscles: Supporting your internal organs and contributing to core stability.
- The Diaphragm: Your primary breathing muscle, which also plays a role in core pressure.
The hollow hold challenges all of these muscles to work together to resist gravity and maintain a specific, controlled position.
Mastering the Hollow Hold: A Step-by-Step Guide
The hollow hold is deceptively simple in its setup, but achieving optimal form requires precision and mindful engagement. Here’s how to execute it correctly:
1. Lower Back Pressed Firmly to the Ground
This is the absolute cornerstone of a successful hollow hold. The primary goal is to actively press your lower back into the floor.
- Why it matters: This action forces your abdominal muscles, particularly your transverse abdominis, to engage intensely. You’re not just lying there; you’re actively creating tension to flatten your lumbar spine against the surface.
- Actionable Tip: Think about "zipping up" your abs and pulling your belly button towards your spine. Imagine you’re trying to create a vacuum effect against the floor. Don’t let your lower back arch.
2. Shoulder Blades Elevated Off the Ground
This is where many people falter. It’s not about lifting your arms; it’s about lifting your upper back.
- Why it matters: Lifting your shoulder blades off the ground creates a lever arm that directly engages your core to stabilize your torso. If your shoulder blades are flat on the floor, you’re not creating the necessary tension.
- Actionable Tip: Focus on initiating the movement from your upper back. Imagine trying to squeeze a pencil between your shoulder blades. You only need a slight lift – even a millimeter can make a difference – but the sensation should be one of active engagement, not passive rest.
3. Maintain a Neutral Chin Position
Resist the urge to tuck your chin tightly to your chest.
- Why it matters: Tucking your chin compromises the neutral alignment of your neck, which can lead to strain. Furthermore, it actually reduces the demand on your core because your head is no longer acting as a significant counterbalance.
- Actionable Tip: Keep your gaze slightly upward, as if you’re looking at a spot on the ceiling just beyond your forehead. Your neck should feel long and relaxed, not strained or compressed.
The Mechanics in Motion: Visualizing the Hollow Hold
Imagine yourself lying flat on your back.
- Engage your core: Take a deep breath in, and as you exhale, actively press your lower back into the floor.
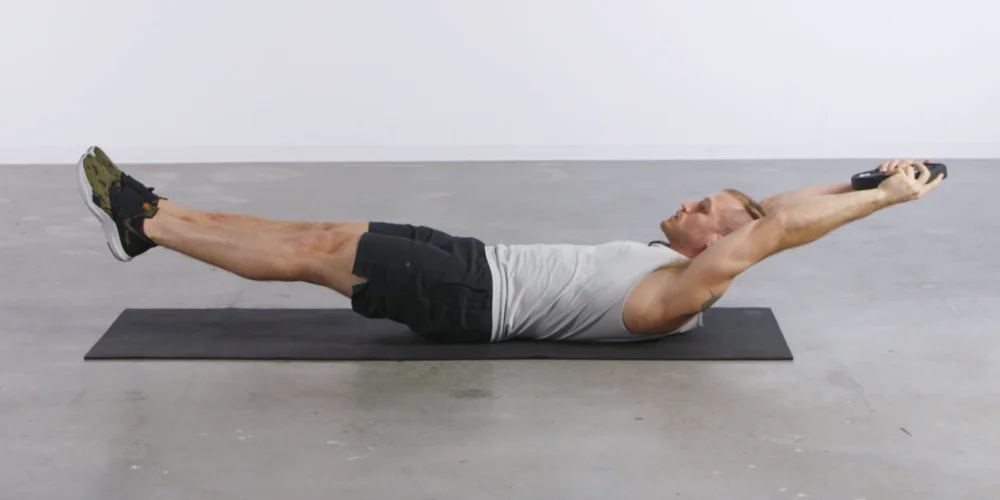
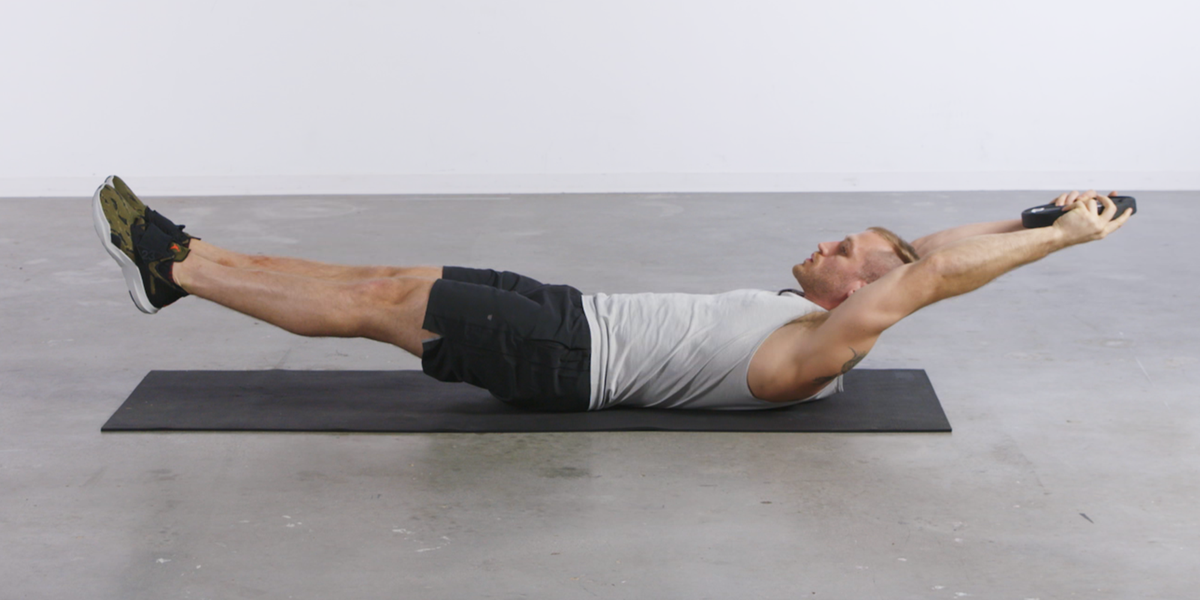
- Lift your upper body: Simultaneously, gently lift your head and shoulders off the ground, ensuring your shoulder blades are just hovering above the floor. Your arms can be extended overhead or by your sides, but the focus should be on the shoulder blade lift.
- Extend your legs: For the full hollow hold, extend your legs straight out, also hovering them slightly off the ground. This increases the lever arm and the challenge.
- Hold and Breathe: Maintain this rigid, hollow position, focusing on continuous core engagement and controlled breathing. Aim for 30 seconds initially, gradually increasing the duration as you get stronger.
The Profound Benefits of the Hollow Hold
The hollow hold is far more than just an ab exercise. Its benefits ripple through your entire body:
Building True Core Bracing Power
This exercise directly trains your core’s ability to resist movement and stabilize your spine. This "bracing" is crucial for:
- Lifting heavy objects: Whether it’s groceries or weights, a braced core protects your spine.
- Athletic movements: Running, jumping, throwing – all rely on a stable core.
- Preventing injuries: A strong core acts as a shock absorber and stabilizer, reducing the risk of back pain and other injuries.
Reinforcing Proper Posture
The hollow hold teaches your body to maintain an elongated, stable posture. This translates to:
- Standing taller: Improved spinal alignment.
- Reduced slouching: Better habits in everyday life.
- Enhanced body awareness: A greater connection to how your body moves and supports itself.
Activating a Wider Range of Core Muscles
Unlike targeted flexion exercises, the hollow hold engages a comprehensive network of core muscles, including:
- Transverse Abdominis: The deep stabilizer.
- Obliques: For lateral stability and control.
- Rectus Abdominis: For isometric tension.
- Lower Back Muscles: To prevent hyperextension and maintain spinal integrity.
This integrated approach leads to more functional and resilient core strength.
Scaling the Hollow Hold: Making It Accessible
If you’re finding the full hollow hold challenging, don’t despair. There are effective ways to modify it to suit your current fitness level:
Modified Hollow Hold (Dead Bug Position)
This is an excellent starting point for beginners.
- How to do it: Lie on your back with your knees bent at a 90-degree angle and your shins parallel to the floor (like a tabletop). Your arms can be extended overhead or by your sides. Focus on pressing your lower back into the floor and lifting your shoulder blades slightly.
- Why it works: By bending your knees, you shorten the lever arm, making it easier to maintain core engagement and keep your lower back pressed down. The focus remains on bracing and upper body lift.
Real-life example: Sarah, a beginner, struggled to keep her lower back from arching during the full hollow hold. By starting with the modified version, she was able to feel her transverse abdominis engaging and learned to control her core tension before progressing.
Adding Leg Lifts
Once you’re comfortable with the modified hold, you can gradually introduce leg extensions.
- How to do it: From the modified hollow hold position, slowly extend one leg straight out, keeping your lower back pressed to the floor. Return to the start and repeat with the other leg. As you get stronger, you can extend both legs.
- Progression: Start with just a few inches off the floor and gradually increase the extension. The key is to maintain lower back contact.
Integrating the Hollow Hold into Your Routine
The beauty of the hollow hold is its versatility. It can be seamlessly incorporated into almost any workout or training day.
- Warm-up: A few short holds can activate your core before a more demanding session.
- Active Recovery: Gentle holds can promote blood flow and core awareness on rest days.
- Finisher: After your main workout, dedicate a few rounds to building isometric strength.
Programming Recommendation:
- Beginners: Start with 3-4 rounds of 20-30 second holds, focusing on perfect form.
- Intermediate: Progress to 3-4 rounds of 45-60 second holds.
- Advanced: Increase hold times, add variations, or decrease rest periods.
Key Principle: Always prioritize tension and form over duration. If you feel your lower back arching or your core disengaging, stop, reset, and try again with better control.
Taking Your Hollow Hold to the Next Level: Variations
Once you’ve mastered the basic hollow hold and its scaled versions, it’s time to introduce variations to keep challenging your core and prevent plateaus.
1. Weighted Hollow Hold
- How to do it: Perform the standard hollow hold, but hold a lightweight plate or dumbbell in your extended hands.
- Why it works: The added weight increases the demand on your core to stabilize against the increased load and leverage.
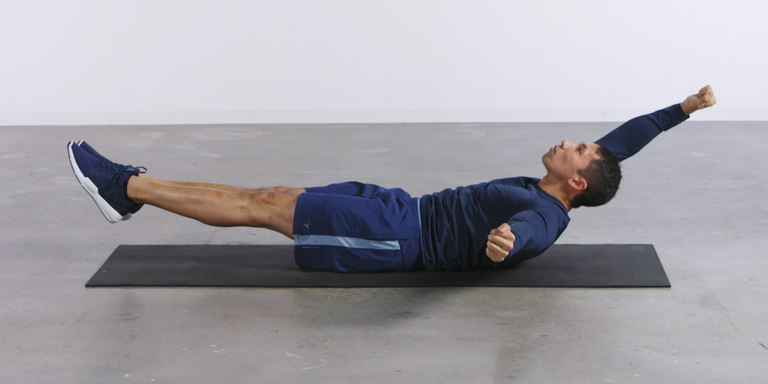
2. Uneven Hollow Hold
- How to do it: From the hollow hold position, form an "L" shape with your arms. Extend one arm overhead and the other out to the side.
- Why it works: This introduces an anti-rotation challenge, forcing your core to work harder to prevent your torso from twisting.
3. Hollow Body Rock
- How to do it: Achieve the hollow hold position, then gently rock your body forward and backward. Maintain continuous tension throughout the movement.
- Why it works: The dynamic nature of the rock challenges your core’s ability to maintain stability through a range of motion, building dynamic core strength.
4. Gator Roll
- How to do it: From the hollow hold position, slowly shift your body to one side, aiming to roll onto your side and then your stomach, all while maintaining tension. Hold briefly, then carefully roll back to the other side.
- Why it works: This is an advanced variation that tests your core’s ability to control momentum and maintain tension through a complex, multi-planar movement. It’s a true test of full-body integration.
Beyond the Hold: The Real-World Impact
The strength you build in a 30-second hollow hold isn’t confined to the gym floor. It translates directly into your daily life and athletic pursuits.
- Reduced Back Pain: By strengthening your core’s stabilizing muscles, you can alleviate and prevent lower back discomfort.
- Improved Athletic Performance: Whether you’re a runner, a weightlifter, or a weekend warrior, a stable core means more efficient power transfer and better control.
- Enhanced Confidence: Knowing you have a strong, resilient core can boost your overall confidence in your physical capabilities.
Conclusion: Embrace the Challenge, Unlock Your Core
The hollow hold is more than just an exercise; it’s a fundamental movement that unlocks a new level of core strength and body control. Don’t underestimate its simplicity. That 30-second hold, when performed with proper form and intent, can be a game-changer for your fitness journey.
So, the next time you’re tempted to churn out endless crunches, remember the power of bracing, the importance of stability, and the profound benefits of the hollow hold. Challenge yourself. Hold it for 30 seconds, then 45, then a full minute. Focus on the tension, the control, and the connection to your deepest core muscles. Your body will thank you for it. Embrace the challenge, and unlock the true power of your core.