Bodyweight back training can feel like an uphill battle. While the pull-up reigns supreme, its demanding nature often leaves many fitness enthusiasts frustrated. Fortunately, there’s a highly effective, yet often misunderstood, exercise that can build serious strength in your upper body’s posterior chain without needing external weights: the inverted row.
You might see the inverted row as a less challenging precursor to the pull-up, and in terms of sheer bodyweight lifted, that’s often true. However, its true power lies in its scalability and the technical precision required to maximize its benefits. Simply sliding under a bar and yanking yourself up won’t cut it. To truly harness the potential of the inverted row and transform your back development, you need to understand the nuances of proper form.
This guide will delve into the common pitfalls that hinder your inverted row progress and provide you with actionable strategies to instantly improve your technique, build more muscle, and unlock your full back-training potential.
Mastering the Inverted Row: A Step-by-Step Approach
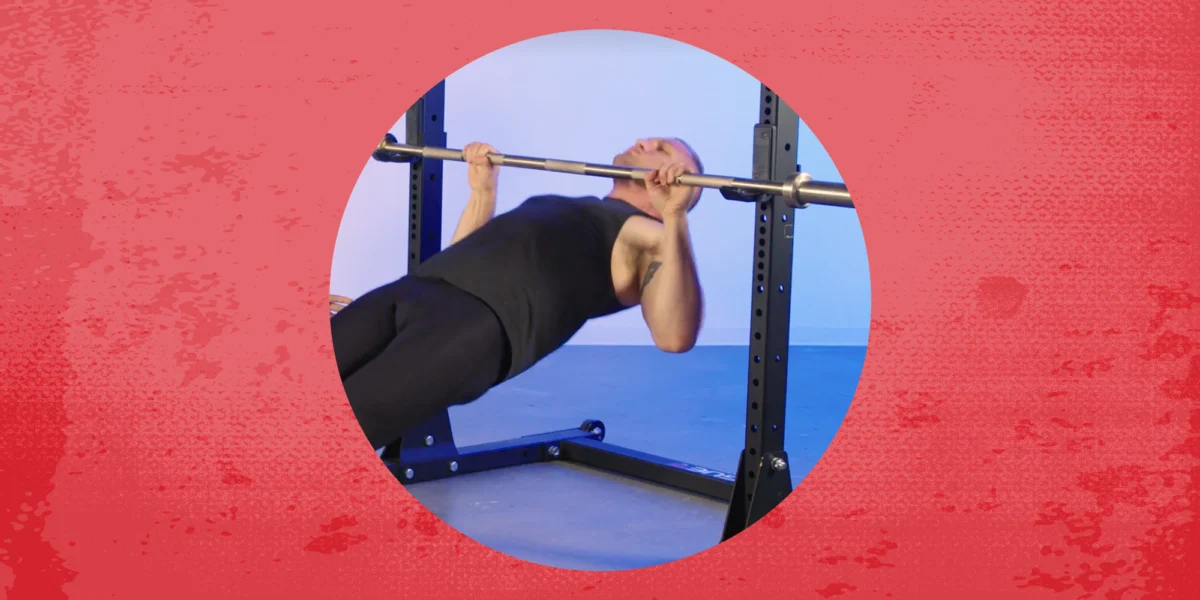
Before we dive into what might be going wrong, let’s establish the foundation of a perfect inverted row. This exercise requires a stable horizontal bar, rack, or even sturdy rings set at a height that allows your body to be at roughly a 45-degree angle to the floor when your arms are fully extended.
Here’s how to set up and execute the movement correctly:
- Grip: Grasp the bar with an overhand grip, slightly wider than shoulder-width. Your palms should face away from you.
- Body Alignment: Position yourself directly underneath the bar. Extend your legs straight out in front of you, creating a straight line from your head to your heels. Your body should be rigid and engaged.
- Initiate the Pull: Begin by pulling your chest towards the bar, focusing on retracting your shoulder blades before you initiate the arm bend.
- Peak Contraction: At the top of the movement, your chest should be close to the bar. Squeeze your back muscles intensely for a brief moment.
- Controlled Descent: Slowly lower yourself back to the starting position, maintaining tension throughout your body.
The Hidden Habits Sabotaging Your Inverted Rows
Many individuals struggle to see the desired results from their inverted rows, often due to subtle, ingrained habits that compromise the exercise’s effectiveness. Let’s uncover these common mistakes and learn how to fix them.
1. Neglecting Total-Body Tension: The "Loosey-Goosey" Effect
One of the most significant errors in performing inverted rows is focusing solely on the pulling motion of the back muscles. While your lats and rhomboids are the primary movers, the inverted row is, in essence, a full-body exercise. Failing to engage your entire kinetic chain leads to energy leaks and significantly reduces the effectiveness of each repetition.
Why it matters:
- Weak Core Engagement: If your core and glutes are not actively working, your hips will sag, and your body will bend at the waist. This creates an unstable base, diverting tension away from your back muscles and onto less-targeted areas.
- Reduced Power Transfer: A lack of full-body tension prevents efficient force production. You’re essentially trying to lift a weight with only a fraction of your body’s potential.
- Increased Risk of Injury: An unstable core can put unnecessary strain on your lower back.
How to instantly improve:

- Squeeze Your Glutes: This is non-negotiable. Before you even begin to pull, actively clench your glute muscles as hard as you can. This will help neutralize your pelvis and create that crucial straight-line body alignment. Think of it as "bracing" your entire posterior.
- Brace Your Abs: Simultaneously, draw your belly button towards your spine, engaging your abdominal muscles. This creates a solid, rigid torso.
- Maintain Throughout: Keep this tension locked in for the entire duration of the exercise, from the bottom of the movement to the top and back down.
2. Incomplete Shoulder Blade Retraction: The Missed Connection
A common oversight is initiating the pull by simply bending the elbows. True back development comes from engaging the muscles that retract and depress your shoulder blades. If you’re not actively squeezing your shoulder blades together before and during the pull, you’re missing out on the primary target muscles.
Why it matters:
- Underdeveloped Rhomboids and Traps: These muscles are crucial for posture and upper back thickness. Without proper activation, they won’t receive the stimulus they need to grow.
- Compromised Rotator Cuff Health: Actively retracting your shoulder blades helps to stabilize your shoulder joint, creating a safer environment for your rotator cuff tendons.
- Less Efficient Pull: You’ll rely more on your biceps and less on your back, turning it into more of an arm exercise.
How to instantly improve:
- The "Shoulder Blade Squeeze" Cue: Before you even lift your body, actively pinch your shoulder blades together as if you’re trying to hold a pencil between them. This cue should be the very first action you take to initiate the pull.
- Focus on the Pull: As you pull yourself up, continue to think about drawing your shoulder blades down and back. Imagine you’re trying to bring them into your back pockets.
- Visualize the Movement: Picture the muscles in your upper back contracting and pulling your body towards the bar.
3. The "Chest to Bar" Obsession: Reaching for the Wrong Goal
Many fitness enthusiasts aim to touch their chest directly to the bar during an inverted row. While this might be achievable for some, it can lead to compensatory movements and a loss of focus on the back muscles for others, especially those with desk jobs or mobility limitations.
Why it matters:
- Arching the Lower Back: To achieve this exaggerated range of motion, individuals often arch their lower back, compromising spinal integrity and shifting the emphasis away from the upper back.
- "Mini-Kipping": Some may resort to a slight hip thrust or "kip" to gain momentum, turning a controlled strength exercise into a momentum-driven movement.
- Shoulder Joint Strain: Forcing the chest to the bar when the shoulder mobility isn’t there can lead to the head of the humerus gliding forward, putting undue stress on the shoulder joint.
How to instantly improve:
- "Pull the Bar to Your Chest": Shift your mental focus. Instead of trying to bring your chest to the bar, think about actively pulling the bar towards your lower chest. This subtle change in perspective helps maintain a more rigid body position.
- Go As High As You Can With Good Form: Prioritize quality over quantity. If your chest doesn’t touch the bar, that’s perfectly fine. Focus on reaching the highest point where you can maintain full-body tension and feel a strong contraction in your back muscles.
- Embrace Your Range of Motion: Understand that your natural flexibility and mobility will dictate how close you can get your chest to the bar. Regularly incorporating chest stretches can improve this over time.
4. Inconsistent Grip Variations: Missing Out on Nuance
While a standard overhand grip is a great starting point, many individuals stick to this one variation exclusively. The beauty of the inverted row lies in its adaptability, and exploring different grips can unlock new training stimuli and address specific weaknesses.
Why it matters:
- Limited Muscle Fiber Recruitment: Different grips emphasize different muscle groups within the back and arms. Sticking to one grip limits the breadth of muscle activation.
- Forearm and Grip Strength Stagnation: Certain grips can challenge your forearm and grip strength more intensely, which is crucial for overall pulling power.
- Shoulder and Elbow Stress: Varying your grip can help distribute stress more evenly across your joints.
How to instantly improve:

- Experiment with Grip Width: Try a wider grip to emphasize your upper back and rear deltoids, and a narrower grip to focus more on your lats.
- Explore Underhand and Mixed Grips: An underhand grip (palms facing you) will engage your biceps more and can feel more comfortable for some. A mixed grip (one palm facing you, one away) can be useful for heavier variations and challenging grip strength.
- Consider Neutral Grips: If you have access to equipment that allows for a neutral grip (palms facing each other), this can be a comfortable option that still provides an excellent back stimulus.
5. Rushing the Movement: The "Cheating" Instinct
In the pursuit of completing reps, many fall into the trap of rushing through the eccentric (lowering) portion of the inverted row. This uncontrolled descent means you’re not fully benefiting from the muscle-building potential of the eccentric phase.
Why it matters:
- Missed Eccentric Strength Gains: The eccentric phase is crucial for building muscle hypertrophy and improving connective tissue strength.
- Reduced Time Under Tension: Rushing leads to less time your muscles spend under load, diminishing the overall stimulus.
- Poor Muscle Control: A fast descent indicates a lack of control and can lead to poor form.
How to instantly improve:
- Embrace the 2-1-2 Tempo: Aim for a controlled eccentric phase that lasts roughly twice as long as the concentric (pulling) phase. For example, pull up for 1 second, pause for 1 second at the top, and lower yourself down for 2 seconds.
- Focus on the "Negative": Think of the lowering phase as an active part of the exercise, not just a transition. Resist gravity and control your descent.
- Pause at the Top: Hold the peak contraction for a full second to truly feel your back muscles working.
Real-Life Application: Putting it All Together
Imagine Sarah, a beginner who’s been struggling to feel her back muscles during inverted rows. She’s been doing them on a Smith machine, with her body almost parallel to the floor, and she’s focused on just getting her chin over the bar.
Here’s how Sarah can apply the advice:
- Increase the Angle: She’ll start by adjusting the bar to a higher position, making her body more vertical. This reduces the resistance and allows her to focus on form.
- Glute and Core Squeeze: Before each rep, she’ll consciously squeeze her glutes and brace her abs, ensuring a straight line from head to heels.
- Shoulder Blade Activation: She’ll practice the shoulder blade pinch before pulling, ensuring she’s initiating the movement from her upper back.
- Focus on "Pulling the Bar": Instead of aiming for her chin over the bar, she’ll focus on pulling the bar towards her lower chest, maintaining that tight body position.
- Controlled Descent: She’ll deliberately slow down the lowering phase, feeling the stretch in her back muscles.
By implementing these changes, Sarah will immediately notice a difference in how her back muscles are engaged, leading to more effective training and visible progress.
The Power of Inverted Rows for Your Fitness Journey
The inverted row is more than just a "pull-up alternative." It’s a foundational exercise that, when performed with proper technique, can:
- Build Upper Back Strength and Thickness: Target your lats, rhomboids, traps, and rear deltoids for a strong and well-developed back.
- Improve Posture: By strengthening the muscles that support your spine, you can counteract the effects of prolonged sitting and improve your overall posture.
- Enhance Shoulder Health: When done correctly, it strengthens the muscles that stabilize your shoulder joint.
- Boost Functional Strength: The full-body engagement translates to improved performance in various athletic activities.
- Be Highly Scalable: From beginner to advanced, the inverted row can be adjusted to match your strength level.
Muscles Worked by the Inverted Row
When executed with proper form, the inverted row is a comprehensive posterior chain exercise. You’ll be directly engaging:
- Latissimus Dorsi (Lats): The large muscles of your back that contribute to width.
- Rhomboids: Muscles between your shoulder blades that help with retraction.
- Trapezius (Traps): Particularly the middle and lower portions, responsible for scapular retraction and depression.
- Rear Deltoids: The back of your shoulders, crucial for shoulder health and posture.
- Biceps Brachii: Secondary movers that assist in the pulling motion.
- Forearms and Grip Muscles: Essential for holding onto the bar.
- Core Muscles (Abs and Obliques): For maintaining a stable, rigid torso.
- Glutes: For maintaining hip and pelvic neutrality.
Common Inverted Row Mistakes Summarized
To reiterate, the most common errors that sabotage your inverted row progress include:
- Lack of Full-Body Tension: Not engaging your glutes and core.
- Inadequate Shoulder Blade Retraction: Failing to squeeze your shoulder blades together.
- Excessive Range of Motion: Arching the back to touch the chest to the bar.
- Sticking to a Single Grip: Limiting muscle activation and strength development.
- Rushing the Eccentric Phase: Skipping the crucial lowering portion of the movement.
Integrating Inverted Rows into Your Routine
The inverted row is a versatile exercise that can be easily incorporated into any workout program.
For Beginners:
Start with 3 sets of 8-10 repetitions, using a higher angle (more vertical body position) to reduce the resistance. Focus intensely on form and full-body tension.
For Intermediate Enthusiasts:
As you get stronger, gradually lower the bar to increase the angle and resistance. Aim for 3-4 sets of 10-12 repetitions. You can also begin to experiment with different grip variations.
For Advanced Trainees:
Increase the challenge by using a more horizontal body position, slowing down the tempo, adding pauses at the top, or utilizing single-arm variations. You can also incorporate them into supersets or circuit training.
Your Back’s Potential Awaits
The inverted row is a powerful tool for building a strong, well-defined back. By understanding and rectifying the common mistakes outlined above, you can transform this exercise from a mediocre movement into a cornerstone of your training.
Don’t let subtle form errors hold you back from unlocking your true potential. Embrace the principles of full-body tension, deliberate muscle activation, and controlled execution. The journey to a more powerful back starts with mastering the fundamentals. So, next time you approach the bar, remember these insights, focus on the quality of each rep, and prepare to feel your back muscles ignite like never before. Your stronger, more resilient physique awaits!